Tag Archive for phishing

Anonymizing Web Traffic

I recently wrote about Secure Internet Browsing and the need for it. Not too long thereafter I found an instance were you might want to make sure that your traffic is anonymous so I will take a closer look at “Onion Routing” and “Tor”.

Tor is a software project that helps you defend against traffic analysis, a form of network surveillance that threatens personal freedom and privacy, confidential business activities and relationships, and state security. Tor protects you by bouncing your communications around a distributed network of relays run by volunteers all around the world: it prevents somebody watching your Internet connection from learning what sites you visit, and it prevents the sites you visit from learning your physical location. Tor works with many of your existing applications, including web browsers, instant messaging clients, remote login, and other applications based on the TCP protocol.

There are several ports of the “Tor” project out there and after evaluating several of them the better one seems to be the Vidalia-Tor-Privoxy Bundle here.

There are several components in this package that warrant explanation.

The Vidalia application is a GUI program to access Tor.

Then we have Tor which uses cryptography in a layered manner working at the TCP stream level as opposed to using application layer solutions like anonymous proxies. Is important to note that Tor (onion routing) is designed to anonymize traffic and does NOT secure it. Additionally there could be some weaknesses that I will address later on DNS leaks, IP address leakage and cookie leakage.

The next component of the bundle is Privoxy which is a non-caching web proxy with advanced filtering capabilities for enhancing privacy listening on port TCP 8118. Privoxy receives requests from the web browser and then forwards web traffic to through the Tor network for anonymity. Tor sits on your PC listening on port TCP 9050 ready to scrub the traffic clean from traffic analysis.

Finally there is TorButton (add-on) which enables Firefox users to enable/disable the use of Tor by the browser with just one click.

I chose not to select this during the install since it has mixed reviews due to bugs and decided to go with a much better add-on called QuickProxy.

There is little you need to do to the default install. You should see Privoxy running on your “Systray” as a blue “P” icon and next to it you should see a “green onion” icon. Clicking on the “green onion” will bring up the Vidalia Control Panel so you can connect to the Tor network.

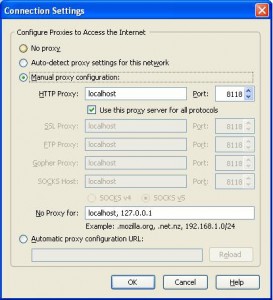
The last thing that needs to be done is to configure your browser to point to the local proxy (Privoxy) running on your PC as shown below.

Click on the Image to enlarge.

At the button of your Firefox browser you should see a Green/Red “P” (QuickProxy) which determines if the proxy is selected or not.

Finally to test if your browser is anonymized. Make sure your Firefox status bar shows the Red “P” and go to http://www.ipchicken.com to determine your IP address. Click on the “P” icon and watch it turn to green and then proceed to refresh your browser and your IP address should change to something random.

Now lets look at the weaknesses starting with DNS leaks.

The Problem: When your applications connect to servers on the Internet, they need to resolve hostnames that you can read (like www.torproject.org) into IP addresses that the Internet can use (like 209.237.230.66). To do this, your application sends a request to a DNS server, telling it the hostname it wants to resolve. The DNS server replies by telling your application the IP address.

Clearly, this is a bad idea if you plan to connect to the remote host anonymously: when your application sends the request to the DNS server, the DNS server (and anybody else who might be watching) can see what hostname you are asking for. Even if your application then uses Tor to connect to the IP anonymously, it will be pretty obvious that the user making the anonymous connection is probably the same person who made the DNS request.

Using Tor in concert with Privoxy pretty much takes care of this, since its a socks4a-capable HTTP proxy but if you intend to anonymize other non-SOCKS aware applications (for instant messaging, Jabber, IRC, etc), that are connected directly to Tor using SOCKS 4 of SOCKS 5 you will be prone to DNS leaks and not be as anonymous as you might think.

The Tor project is working to resolve this in their next release by including a DNS resolver that will send queries over the mixed network.

Alternatively you can modify how Firefox performs DNS lookups which is generally done by handing down the request to the operating system.

To force DNS requests into the Tor channel, visit the special URL about:config and find the key network.proxy.socks_remote_dns. Set it to true

Now what about cookie leakages.

Websites are allowed unless specifically told otherwise to store bits of information on your PC, to determine its you the next you visit. This allows for a more fluent and pleasant experience on any site you log into.

Now when you want to disassociate yourself from your identity it presents a problem. When you visit a website that has already placed a cookie on your computer and then you visit it again with your Tor identity, the website can determine that even though the originating IP addresses are different, it is in fact the same person. Making sure you have a second Firefox account or have erased your cookies becomes paramount to maintain your identities separate.

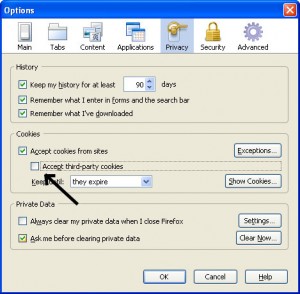
Additionally you have to worry about cross-site cookies which can be solved by allowing cookies for the originating website only, and have them kept only until Firefox is closed as seen below.

Click on the Image to enlarge.

Finally a word on security.

As Tor relies on a network of people around the world serving as relays to the traffic, you can easily see how a particular request to a website sending over a clear channel a username/password combination might be problematic. Someone actually listening (Tor Relay) to the traffic relayed through them will be able to pick up this information.

Even worse scenario would be someone phishing for information at an exit node and pretending to be a website you are visiting.

The most simple solution for this is to only use SSL and forcing Firefox to tell you if you are about to send information to an un-encrypted website.

Turn on warnings for secure and insecure sites. At the Firefox configuration URL about:config, find the keys beginning with security.warn_. Set all of them to true, except for the once ending in .show_once, which should be set to false. Then set security.warn_entering_secure to false — you really don’t need to be alerted to that.

If you visit a site and the browser tells you that the SSL certificate may be invalid, don’t trust it!

[ad]

Sources:

Wikipedia

The Tor Project

Setting up a Mail Relay on CentOS 5

This will give you the capability to scan e-mails for spam, viruses and phishing using a variety of open source programs before they arrive to your e-mail server.

From Sekipedia
Jump to: navigation, search

* Install CentOS 5.1 barebones (customizing the install with nothing checked.)

* Update the system

yum update

* Install Additional packages

yum install ntp

yum install vixie-cron crontabs

* Download and install Webmin

cd /opt

wget http://prdownloads.sourceforge.net/webadmin/webmin-1.430-1.noarch.rpm

yum install perl-Net-SSLeay

rpm -ivh webmin-1.430-1.noarch.rpm

* Disabled unneeded services

service iptables stop
service ip6tables stop
service netfs stop
chkconfig iptables off
chkconfig ip6tables off
chkconfig netfs off

* Install Postfix

yum install postfix

* Configure Postfix

myhostname = titan.corp.com
mydomain = localhost
myorigin = $mydomain
inet_interfaces = all
mydestination = $myhostname, localhost.$mydomain, $mydomain
mynetwork_style = class

* Configure Postfix to forward email

relay_domains = lab.net

This tells Postfix which domains it should relay mail. All mail destined for this domain (and only this domain) will be forwarded to its remote SMTP server. You can put multiple domains here, just separate them with a comma or whitespace.

Add line to end of main.cf

transport_maps = hash:/etc/postfix/transport
mailbox_size_limit = 20480000

This tells Postfix what method to use to resolve the destination address for relayed mail:

Add line to end of “/etc/postfix/transport”

lab.net smtp:[192.168.2.225]

This command specifically maps the domain “lab.net” to the IP address 192.168.2.225 and tells Postfix to use SMTP as the transport. All mail destined for lab.net which is relayed through this Spam Gateway will be forwarded via SMTP to 192.168.2.225.

Then run command:

postmap /etc/postfix/transport

This command builds the hash table/file which Posfix will use to forward mail. If you don’t do this, it wont work.

Finally add this line to main.cf

append_at_myorigin = no

These lines will make sure your Spam Gateway does not add any of its own header domain info to the mail as it passes thru.

* Test Again

Stop and start postfix to make sure all changes take.

service postfix stop
service postfix start

I know this is redundant, but you really should test your system again before installing MailScanner. Make sure that mail gets passed through the system without problem. If you do encounter a problem, it will be a lot easier to fix it now than after you’ve installed MailScanner, SpamAssassin and ClamAV.

At this point incoming e-mail should go through the Mail Relay and be forwarded to the internal E-mail server.

* Install DAG’s GPG key

rpm –import http://dag.wieers.com/rpm/packages/RPM-GPG-KEY.dag.txt

* Verify the package you have downloaded

rpm -K rpmforge-release-0.3.6-1.el5.rf.*.rpm

Security warning: The rpmforge-release package imports GPG keys into your RPM database. As long as you have verified the package and trust Dag then it should be safe.

* Download and Install the package

wget http://packages.sw.be/rpmforge-release/rpmforge-release-0.3.6-1.el5.rf.i386.rpm
rpm -ivh rpmforge-release-0.3.6-1.el5.rf.*.rpm

This will add a yum repository config file and import the appropriate GPG keys. At this point, you can set the priority of the RPMForge repository, and also of the CentOS repositories if you have not done so yet.

* Test with this command:

yum check-update

* Update the system

yum update

* Install perl modules and dependencies for MailScanner

yum install –enablerepo=rpmforge perl-Archive-Zip perl-Convert-BinHex perl-Convert-TNEF perl-DBD-SQLite perl-Filesys-Df perl-HTML-Parser

yum install –enablerepo=rpmforge perl-IO-stringy perl-MIME-tools perl-Net-CIDR perl-Sys-Hostname-Long perl-OLE-Storage_Lite

yum install tnef

* Download and Install MailScanner

wget http://www.mailscanner.info/files/4/rpm/MailScanner-4.71.10-1.rpm.tar.gz

tar -zxvf MailScanner-4.71.10-1.rpm.tar.gz

cd MailScanner-4.71.10-1

rpm -ivh mailscanner-4.71.10-1.noarch.rpm

chkconfig postfix off

service postfix stop

chkconfig MailScanner on

* Configure MailScanner Settings

Updates to postfix’s main.cf by adding this line:

header_checks = regexp:/etc/postfix/header_checks

In the file /etc/postfix/header_checks add this line:

/^Received:/ HOLD

Here are the edits to Mailscanner – place / update in /etc/MailScanner/MailScanner.conf

Run As User = postfix
Run As Group = postfix
Incoming Queue Dir = /var/spool/postfix/hold
Outgoing Queue Dir = /var/spool/postfix/incoming
MTA = postfix

Optional edits to MailScanner

Change %org-name%
Change %org-long-name%
Change %web-site%

Here’s some file permissions changes you’ll need to make:

chown postfix.postfix /var/spool/MailScanner/incoming
chown postfix.postfix /var/spool/MailScanner/quarantine

service MailScanner start

Its a good idea to test the server now. Send a message to the remote server and see if it goes through. It should, and then you can move to installing SpamAssassin.

* Install perl modules for SpamAssassin

yum install perl-Digest-SHA1 perl-Net-DNS perl-Archive-Tar perl-IO-Zlib

yum install –enablerepo=rpmforge perl-Encode-Detect perl-Mail-SPF perl-IP-Country perl-Mail-DKIM perl-Net-Ident

* Update the system

yum update

* Install and Configure SpamAssassin

yum install spamassassin

You don’t need to edit any of the SpamAssassin conf files because all of the configuration is done through MailScanner.

In /etc/MailScanner/MailScanner.conf we will make these changes:

Change this line:

Use SpamAssassin = no

to:

Use SpamAssassin = yes

Update the SpamAssassin User State Dir setting:

SpamAssassin User State Dir = /var/spool/MailScanner/spamassassin

and then run commands:

mkdir /var/spool/MailScanner/spamassassin
chown postfix.postfix /var/spool/MailScanner/spamassassin

Restart MailScanner to make changes stick.

service MailScanner restart

* SELinux exception for Clamav

setsebool -P clamd_disable_trans=1 or disable SELinux while Clamav is installed.

* Install ClamAV

yum install clamav clamav-db –enablerepo=rpmforge

* Configure ClamAV and MailScanner Settings

In /etc/freshclam.conf make the following edits:

Add ‘#’ in front of the word ‘Example’

Do the same in /etc/freshclam.conf

Now you need to update ClamAV’s virus signature files

[root@smtp]# freshclam

ClamAV update process started at Fri Sep 19 12:45:42 2008
main.cld is up to date (version: 48, sigs: 399264, f-level: 35, builder: sven)
daily.cvd is up to date (version: 8287, sigs: 29596, f-level: 35, builder: arnaud)

Update MailScanner’s configuration file to use ClamAV

‘Virus Scanners = clamav’

In MailScanner.conf, check the setting of ‘Monitors for ClamAV Updates’ to ensure it matches the location of your ClamAV virus database files.

This should be “/var/clamav/*.cld /var/clamav/*.cvd”.

* Installing Postgrey

yum install postgrey

* Configuring Postgrey

Edit /etc/postfix/main.cf and add the following to smtpd_recipient_restrictions.

permit_mynetworks,
reject_unauth_destination,
reject_unlisted_recipient,
check_policy_service unix:postgrey/socket

check_policy_service unix:postgrey/socket performs the greylisting while adding reject_unlisted_recipient before it enables Postfix to immediately reject unknown recipients instead of having clients go through the greylisting process before being informed that the recipient does not exist.

To disable greylisting for certain IP addresses or hostnames, add the IP address, hostname or regular expression to match hostnames into the file /etc/postfix/postgrey_whitelist_clients.local.

Hostnames are identified by performing a reverse DNS on the client’s IP address.

For sample entries, view the file /etc/postfix/postgrey_whitelist_clients.

* Update the system

Make one last final update to make sure your system is updated.

yum update

[ad]